Getting Started
Download and Install Java This section very important for you if this is first time develop android, if you already develop android project you can SKIP this page.
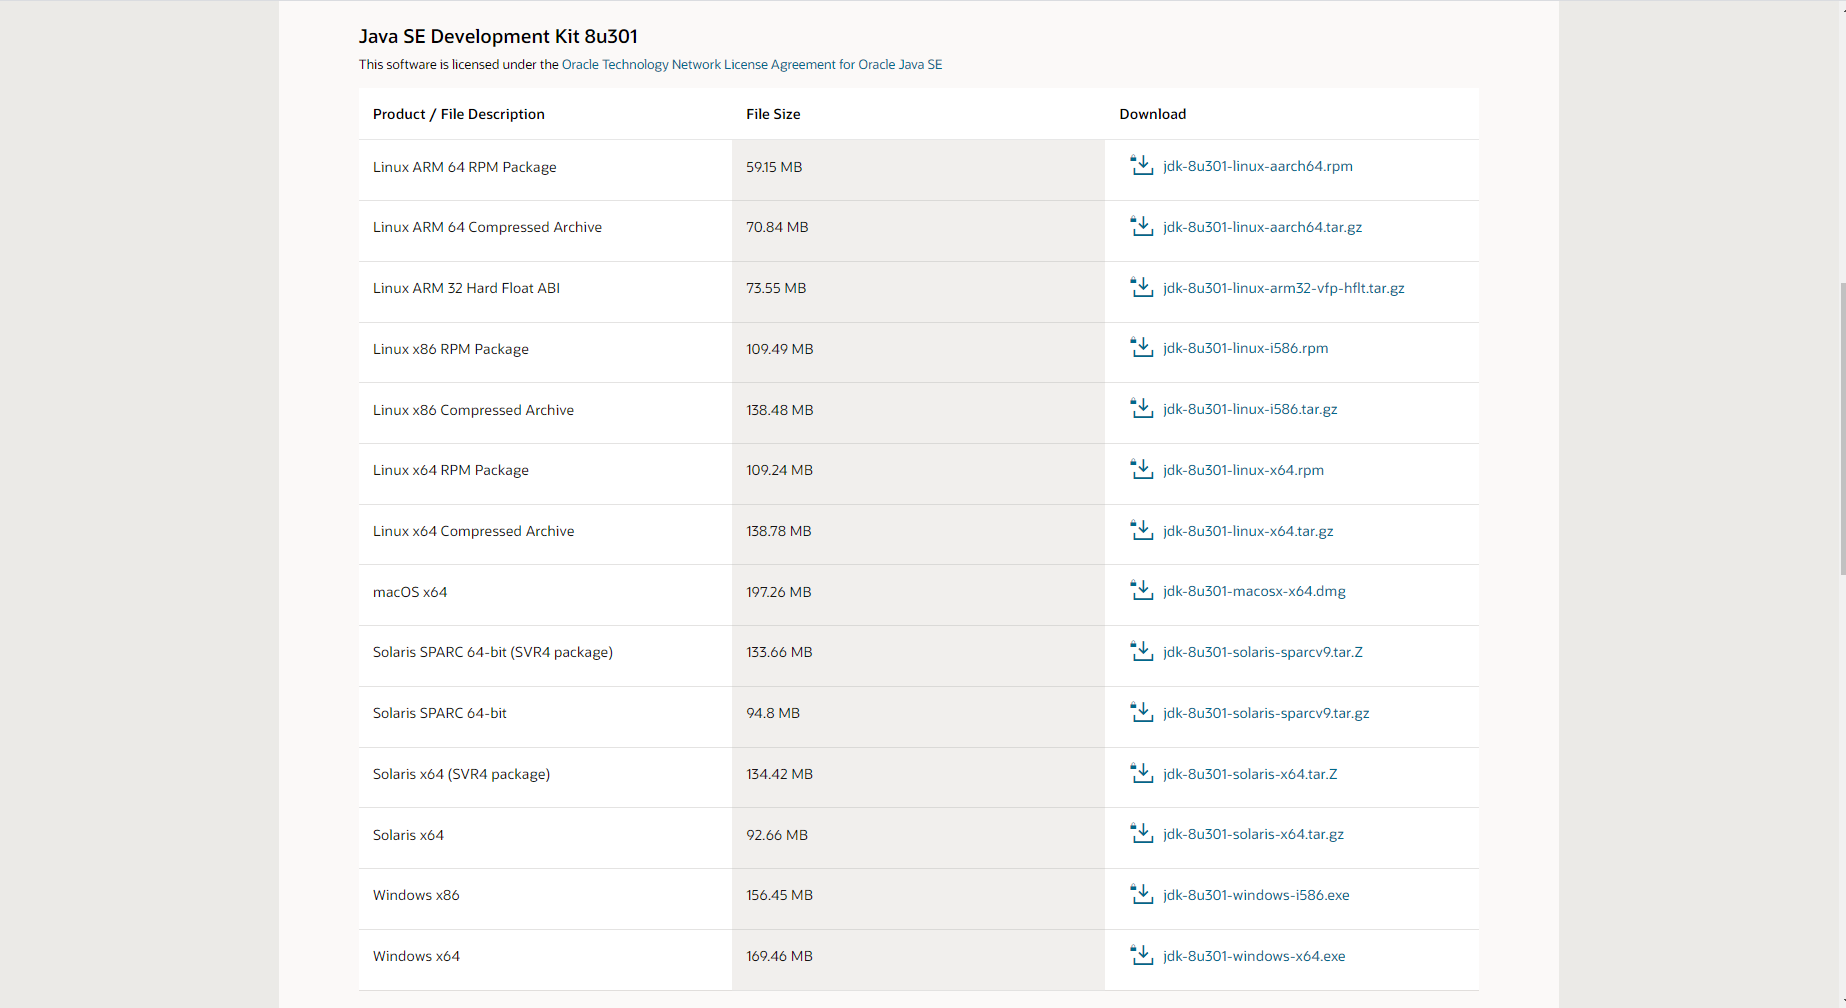
You can download JDK from this url : https://www.oracle.com/java/technologies/javase/javase-jdk8-downloads.html
Firebase
Before you do step change the package name, you must do this step for firebase project configuration
Please note : this step is mandatory to generate google-services.json file

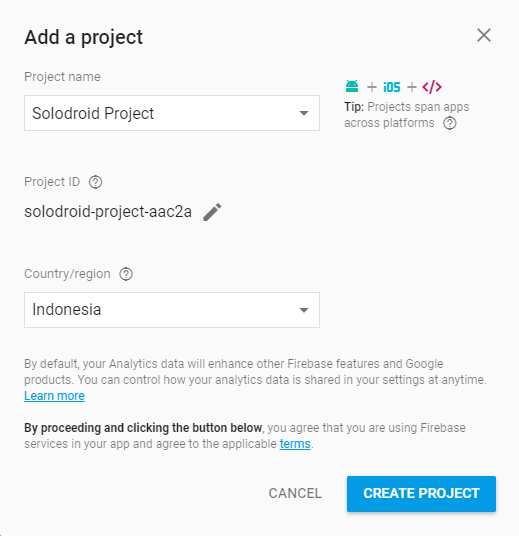
Please register or log in first and then select create new project. In the dialog window enter the name of the project that will be created and the contents of the state and then click the create project to continue.
After successfully creating a project on Firebase then the page will be redirected to the dashboard project that has been made.
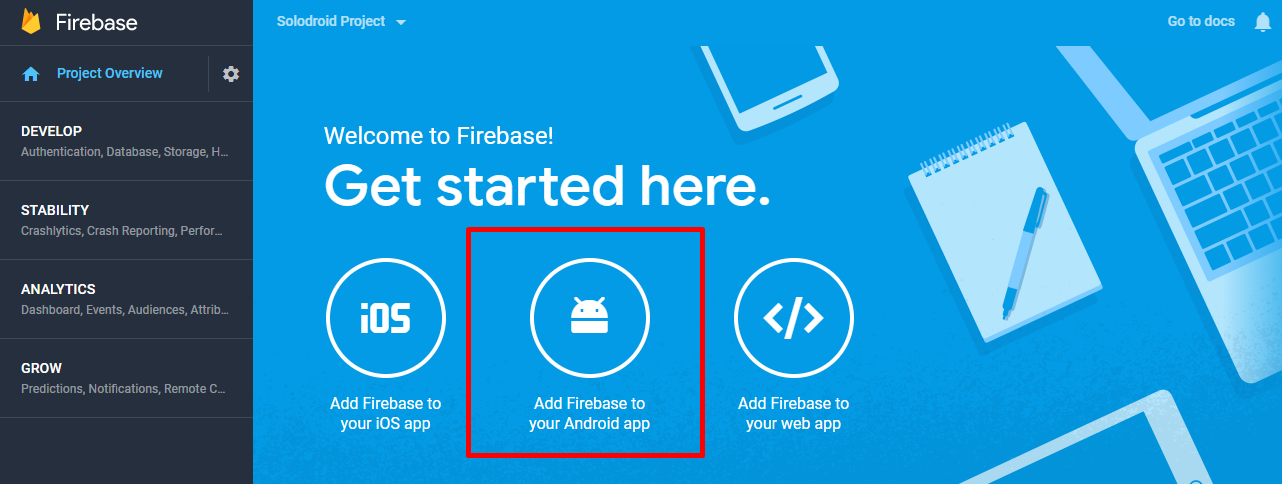
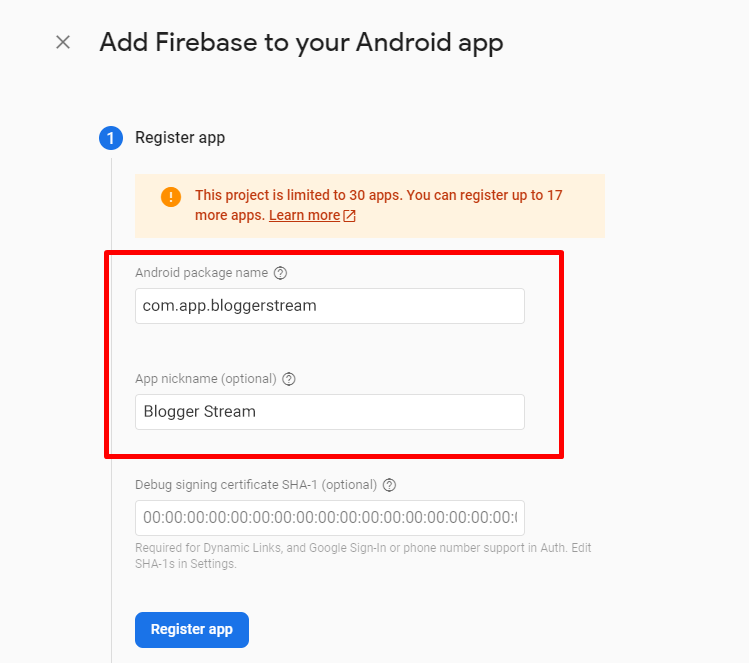
Then on the dashboard Firebase select Add Firebase to your Android app. In the next dialog window enter the name of the Android application package and SHA1 of fingerprints Certificate (optional).
Next will download the configuration file json google-services.json


Package Name
1.Open Gradle Scripts → build.gradle (Module: app)2.Change the applicationId with your own id name3.Standard naming procedure : com.domain.appname4.Click Sync Now.5.Change the id as unique as possible, because application id is very important used if you want to publish the application to the google play.
Step 1 (applicationId)Important : your applicationId or package name must same with your package name that you’ve create on firebase console when you generate google-services.json1.Click once on your package and then click setting icon on Android Studio.2.Close / Unselect Compact Empty Middle Packages3.Right click your package and rename it for each part according to your applicationId structure name
Step 2 (Package folder name)1.Back to Gradle Scripts → build.gradle (Module: app)2.Change the namespace same with your applicationId and package folder name
Step 3 (namespace)
Step 4 (Required if OneSignal used)If you use OneSignal for sending push notification, you must manually change the NotificationServiceExtension value in the AndroidManifest.xml according to your package name<meta-dataandroid:name="com.onesignal.NotificationServiceExtension"android:value="<your_package_name>.notification.NotificationServiceExtension"


Blogger API v3
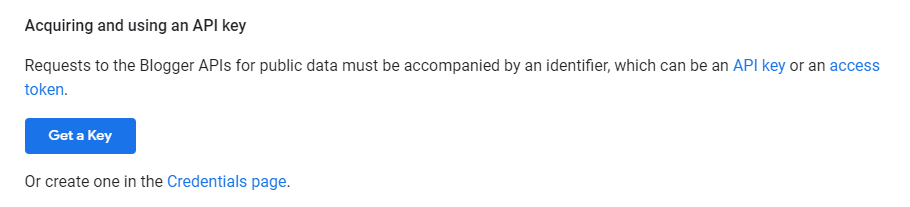
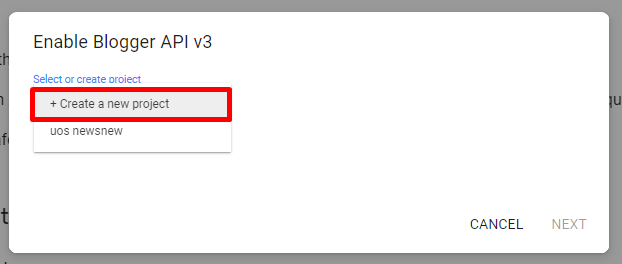
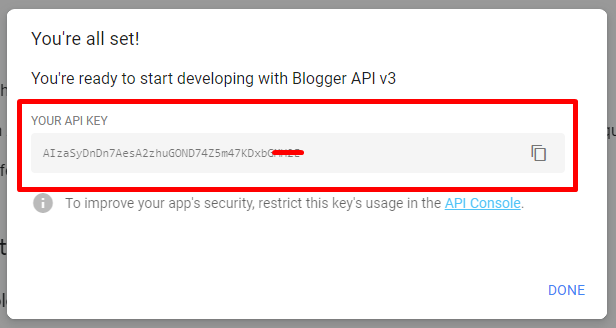
Getting the API Key
In order to access the blogger API, you need an API Key, to generate an API Key, please visit this page :Scrolling down and find the button "Get a Key" then click it to generate the API Key.Select or create a new project if you don't have a project beforeYour Blogger API v3 is enabled and the API Key has been generated, save the API Key for the next configurationSave your API Key into the config.json


Blogger ID
Blogger ID is required so that the content of your blogger website can be displayed in the application, there are 2 methods to get Blogger ID
Method 1
1.Open page www.blogger.com and select your website (Required login with your Google Account)2.In the address bar of your web browser, you will see your Blogger ID3.Example : https://www.blogger.com/blog/posts/<BLOGGER_ID>1.Open your blogger website in the web browser, then Right click and select View page source2.Click Ctrl + F for quick search and enter keyword : 'blogId'3.The Blogger ID can be known with this format : 'blogId': '28912482044727XXXXX'
Method 2Save your Blogger ID into the config.

YouTube API Key
Get YouTube API Key
Remote Config
Remote config is used to update data and some important configurations in the application. This configuration is done via the config.json file, you can upload the config.json file in your Google Drive account or upload it to your hosting account if you have one.
Login to your Hosting account and upload config.json file in your hosting via File Manager or FTP Server and get the json file url.
JSON Url format example :
https://solodroid.net/demo/blogger_stream/config.json
If you choose to upload the config.json file in your Google Drive account, you need to do some configuration below :
Login to your Google Drive account and upload config.json file in any place or folder, then Right click the file and select Get link
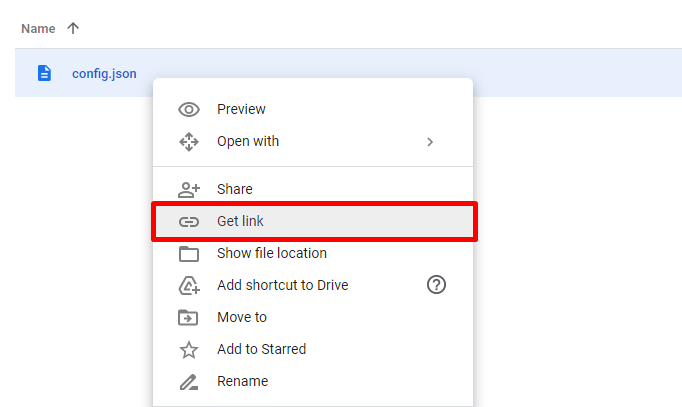
Change the file access permission from Restricted to Anyone with the link, then click Copy link

If you have got your Google Drive Shared Link or File ID, there is still the next step, which is to get your Access Key. It's requires your Item Purchase Code, Google Drive Shared Link or File ID for your JSON file remote configuration and the package name of the application you want to create.
Here are some json object values for remote configuration in applications that are considered important to explain their functions, some values are not explained and can be understood easily according to the object names.
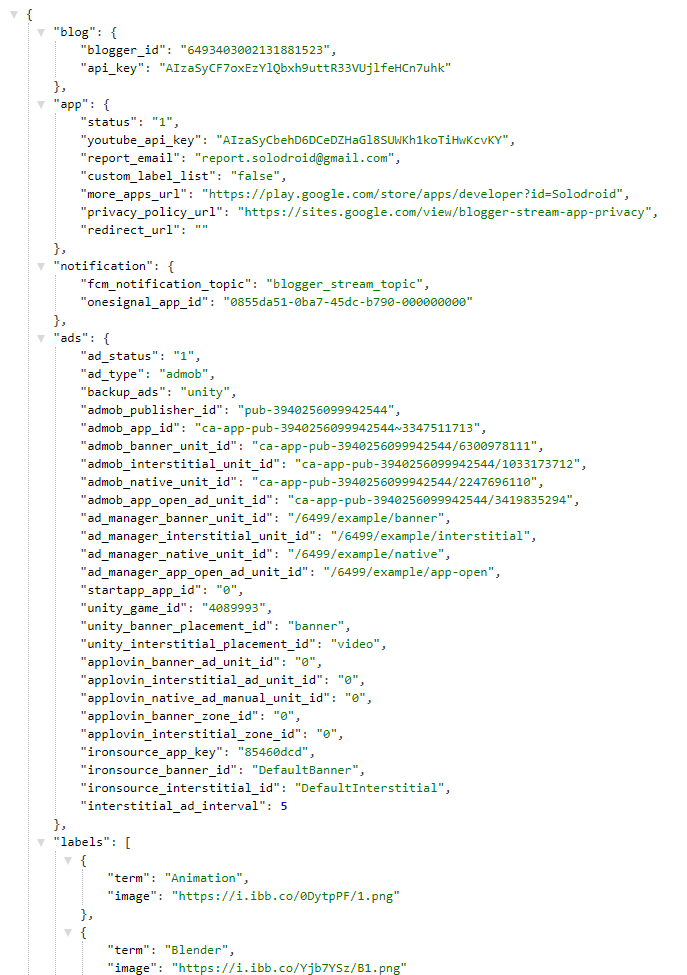
Format Json Blog
- blogger_id : Blogger ID for your Blogger site
- api_key : Generated key for accessing Blogger API
Format Json App
- status : Supported values are 1 and 0. The value 1 indicated that the app is live and the value 0 indicated the app is suspended or off and automatically will use redirect_url parameter to redirect app to other url
- youtube_api_key : API key for playing video from youtube source
- report_email : Email address for user sending report for certain video or streaming url
- more_apps_url : Url for more apps feature
- privacy_policy_url : Privacy Policy Url for your app
- redirect_url : Redirect app to other url as example if the current app is no longer used or suspended, redirect url only used if app status is 0
- custom_label_list : Enable custom labels to support displaying labels with images, set "true" value to enable and "false" to disable (automatically retrieve labels using Blogger API)
Format Json Notification
- fcm_notification_topic : Firebase notification topic name should be written in lower case without space (use underscore)
- onesignal_app_id : Your OneSignal App ID if you want to send push notification from OneSignal
Format Json Ads
- ad_status : Enable or Disable Ads, supported values are 1 and 0. The value 1 to enable ads and the value 0 to disable ads.
- ad_type : Primary Ad Network for your app, supported values are admob, google_ad_manager, startapp, unity, applovin_discovery, applovin_max or ironsource. If you use Meta Audience Network bidding, select your ad type to admob, applovin or mopub as mediation partner for your Meta Audience Network Ad.
- backup_ads : Backup Ad Network for your app if your Primary Ad Network failed to load Ads, e.g : your Primary Ad Network has been banned or suspended, supported values are admob, google_ad_manager, startapp, unity, applovin_discovery, applovin_max, ironsource or put none if you don't want to use backup ads
- interstitial_ad_interval : Number of interval for dispalying Interstitial Ad in the post list every X click
Format Json Labels
Only used when custom_label_list is enabled with "true" value
- terms : your blog label name
- image
Post a Comment